Hello world!

Welcome to WordPress.com. This is your first post. Edit or delete it and start blogging!

Posted in Uncategorized | 1 Comment

Click Once + “Reference in the manifest does not match the identity of the downloaded assembly” + Console Application

While trying to deploy a window application using Click Once, I suddenly started to see the error message “Reference in the manifest does not match the identity of the downloaded assembly”.
The issue started because I added an extra Console Application project to the solution and it is referenced by the project I want to deploy using ClickOnce.
Solution: at the Application tab on the Console Application project (the one that is referenced by the project you want to deploy using ClickOnce), change the Manifest combo value (section “Icon and manifest”) to “Create application without manifest”:

Posted in Development | Leave a comment

Configuring a TP-Link W8910G wireless router for an ADSL connection for SAPO portuguese ISP

If you need to configure a TP-Link ADSL wireless router, model W8910G, to SAPO ISP (portuguese Internet Service Provider for ADSL connections),
please follow the picture I got when configuring mine, at my home place.
 
First of all, connect your PC using an ethernet cable to your router.
Use your browser (I used Internet Explorer 7.0) to access http://192.168.1.1
You should provide user and password to access the page (default user is admin, default password is admin, but you should change it asap).
 
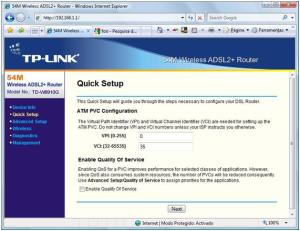
After reaching the page, you should go to "Quick Setup" option.
Required values are 0 for Virtual Path Identifier (VPI) and 35 for Virtual Channel Identifier (VCI):
 
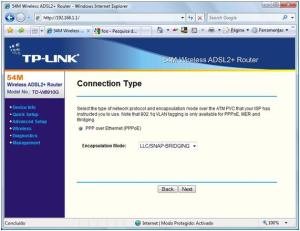
By clicking next, you should choose PPPoE connection type, with "LLC" Encapsulation Mode:
 
By clicking next, you should provide your PPP username and PPP password (provided to you by SAPO).
PPPoE Service Name shoud be blank, Authentication Mode should be AUTO:
 
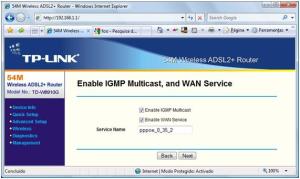
By clicking next, you should provide IGMP Multicast and Wan Service (nothing was changed here):
 
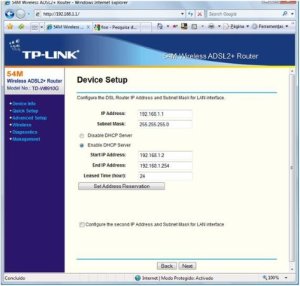
By clicking next, you should provide DSL router IP and DHCP Mode (again, nothing was changed in this screen):
 
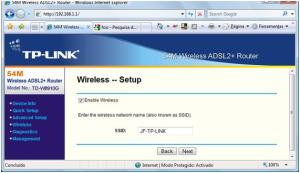
By clicking next, you reach the wireless configuration page. If you want to enable wireless access, check the "Enable Wireless" checkbox, and choose a SSID for your network (it is just a name for your network).
I changed it to "JF-TP-LINK", but you can put there any value:
 
The last page is just for confirmation. It will reboot the router. After that, you should have internet connection through SAPO ISP:
 
Note: You should protect your wireless network after making it available.
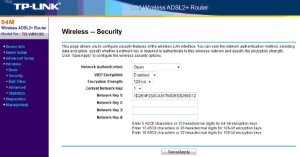
At least (although there are other strong mechanisms for doing that), you should configure a WEP 128 key for wireless access.
Please, remember that this settings will only affect wireless access to your router. Connections through ethernet cables will not be affected by this settings.
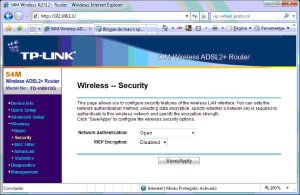
For doing so, please access the Wireless / Security option:
 
Change WEP Encryption to "Enabled" and provide a WEP key for you router (I’m providing a sample, but should change it to your own values, choosing characters between 0 to F):
 
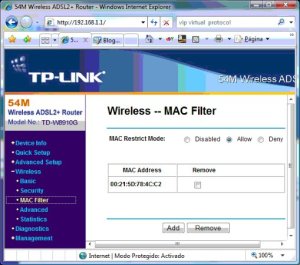
On top of this, you can also provide a list of authorized mac addresses, by going into the Wireless / MacFilter option:
 
Enjoy!
Posted in Computadores e Internet | Leave a comment

Windows Forms: printing a pdf file in C# 2.0

The problem: I have a Windows application developed in C# 2.0 and I want to print a pdf document.
 
The solution: Acrobat Reader 6.5 and higher are suposed to have an activex control that you can use inside C# to manipulate a pdf document.
This was tested against Acrobat Reader 8, using Visual Studio 2005.
 
Steps:
1 – You need to have Acrobat Reader 8 installed in your machine.
2 – Make a reference to AcroPDF.dll, you should find it at C:\Program Files\Common Files\Adobe\Acrobat\ActiveX.
3 – Add the Adobe PDF Reader to your control’s toolbox: go to the Tools menu / Choose Toolbox Items / Tab COM Components and select the checkbox for the Adobe PDF Reader control.
4 – At this stage, you should have the control in your toolbox. It should be under the General group. Drag it to your form.
5 – Add the following code:
 
private void button1_Click(object sender, EventArgs e)
        {
            this.axAcroPDF1.Dock = System.Windows.Forms.DockStyle.Fill;
            this.axAcroPDF1.Enabled = true;
            this.axAcroPDF1.Location = new System.Drawing.Point(0, 0);
            this.axAcroPDF1.Name = "axAcroPDF1";
            this.axAcroPDF1.OcxState = ((System.Windows.Forms.AxHost.State)(resources.GetObject("axAcroPDF1.OcxState")));
            //if you want to visualize the document before print
            this.axAcroPDF1.Size = new System.Drawing.Size(292, 266);
            this.axAcroPDF1.TabIndex = 0;
            this.axAcroPDF1.TabStop = false;
            //If you do not want to visualize the document
            this.axAcroPDF1.Visible = false;
            //wherever you load the document you put this:
            this.axAcroPDF1.LoadFile("C:\\MyTmp\\foo\\tmp\\2delete\\Report3.pdf");

            //wherever you want to print the document:
            this.axAcroPDF1.printAll();//N.B. if you do not set in advance the
            // print options of the document it will 
            //be printed by default to the Windows
            //MDI document printer, which is not very
            // convenient, so take care to set any
            //necessary printing parameter
        }
Posted in Development | Leave a comment